Once you have configured the NetBeans Update Center Beta, you can now download and install the JavaFX Script plugin using the steps below.
(1) Select Tools > Update Center from the main menu of the IDE.
(2) In the Select Location of Modules page, select the NetBeans Update Center Beta check box and unselect all other checkboxes.

(3) Click Next and the wizard checks for any available updates for the plugin.
(4) In the Select Modules to Install page, select the four JavaFX Features nodes and click Add.

(5) Click Next.
(6) Click Accept in the License Agreement dialogs. The Download Modules page appears and progress is shown as the modules are downloaded.
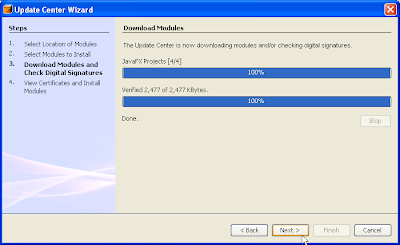
(7) Click Next after the modules have been successfully downloaded.The View Certificate and Install Modules page is displayed list of certificates are made available for your viewing.

(8) Click Finish to proceed with the installation of the JavaFX plugin modules.The IDE proceeds with the installation.
(9) From the main menu, click Tools > Module Manager.The JavaFX Editor, JavaFX Projects, and JavaFX UserLibrary module nodes are now listed, as shown below. The JavaFXLibrary node can be found under the last Libraries node.
(1) Select Tools > Update Center from the main menu of the IDE.
(2) In the Select Location of Modules page, select the NetBeans Update Center Beta check box and unselect all other checkboxes.

(3) Click Next and the wizard checks for any available updates for the plugin.
(4) In the Select Modules to Install page, select the four JavaFX Features nodes and click Add.
The Include in Install pane is updated with the JavaFX modules, as shown below.

(5) Click Next.
(6) Click Accept in the License Agreement dialogs. The Download Modules page appears and progress is shown as the modules are downloaded.

(7) Click Next after the modules have been successfully downloaded.The View Certificate and Install Modules page is displayed list of certificates are made available for your viewing.

(8) Click Finish to proceed with the installation of the JavaFX plugin modules.The IDE proceeds with the installation.
(9) From the main menu, click Tools > Module Manager.The JavaFX Editor, JavaFX Projects, and JavaFX UserLibrary module nodes are now listed, as shown below. The JavaFXLibrary node can be found under the last Libraries node.

(10) Click to dismiss the Module manager.
(11) Proceed to the Getting Started with the JavaFX Script Language tutorial to create your first JavaFX Script program.

沒有留言:
張貼留言